Showing posts with label food. Show all posts

Thursday, October 2, 2014

A Bearded Man Cooks Me Dinner

In our house I do most of the cooking—not because Mark is terrible, but because I enjoy it. However, there are some nights when I just don't feel like cooking... Luckily, he is there to save the day and whip up something tasty.

Last week Mark barbecued these delicious skewers on our Hasty Bake. He boiled the potatoes and corn on the stove. Then he stuck corn, potatoes, shrimp (and sausage on his) on wooden skewers, before seasoning them and grilling them on the BBQ. He served them over brown basmati rice. This meal was pretty simple and quite yummy!


Last night Mark created a veggie tikka masala Indian dish. He chopped cilantro, zucchini, squash, mushrooms, potatoes, and onion. He sauteed them in a large pan on the stove and once they were no longer raw, he mixed in a tikka masala sauce packet from Sprouts and a large handful of raw cashews. Once everything had simmered together for about 30 minutes he served it over tandoori rice and garnished with more cilantro. I have never been much of an Indian food lover, but Mark is a huge fan! I figure since he is—ever so-lovingly—putting up with my vegetarian dishes, it is only fair to branch out into his neck of the woods. I actually really enjoyed this dinner for a change! It was flavorful and zesty, plus it tastes identical to the way it smells (which I find uncommon for most foods). 


So grateful for this man! Thank you for being so supportive and encouraging during this time of change and exploration in my life. You are more than I could have ever hoped for and I appreciate your constant involvement as I strive to be the best woman, wife, and person I can be. 

Thursday, September 25, 2014

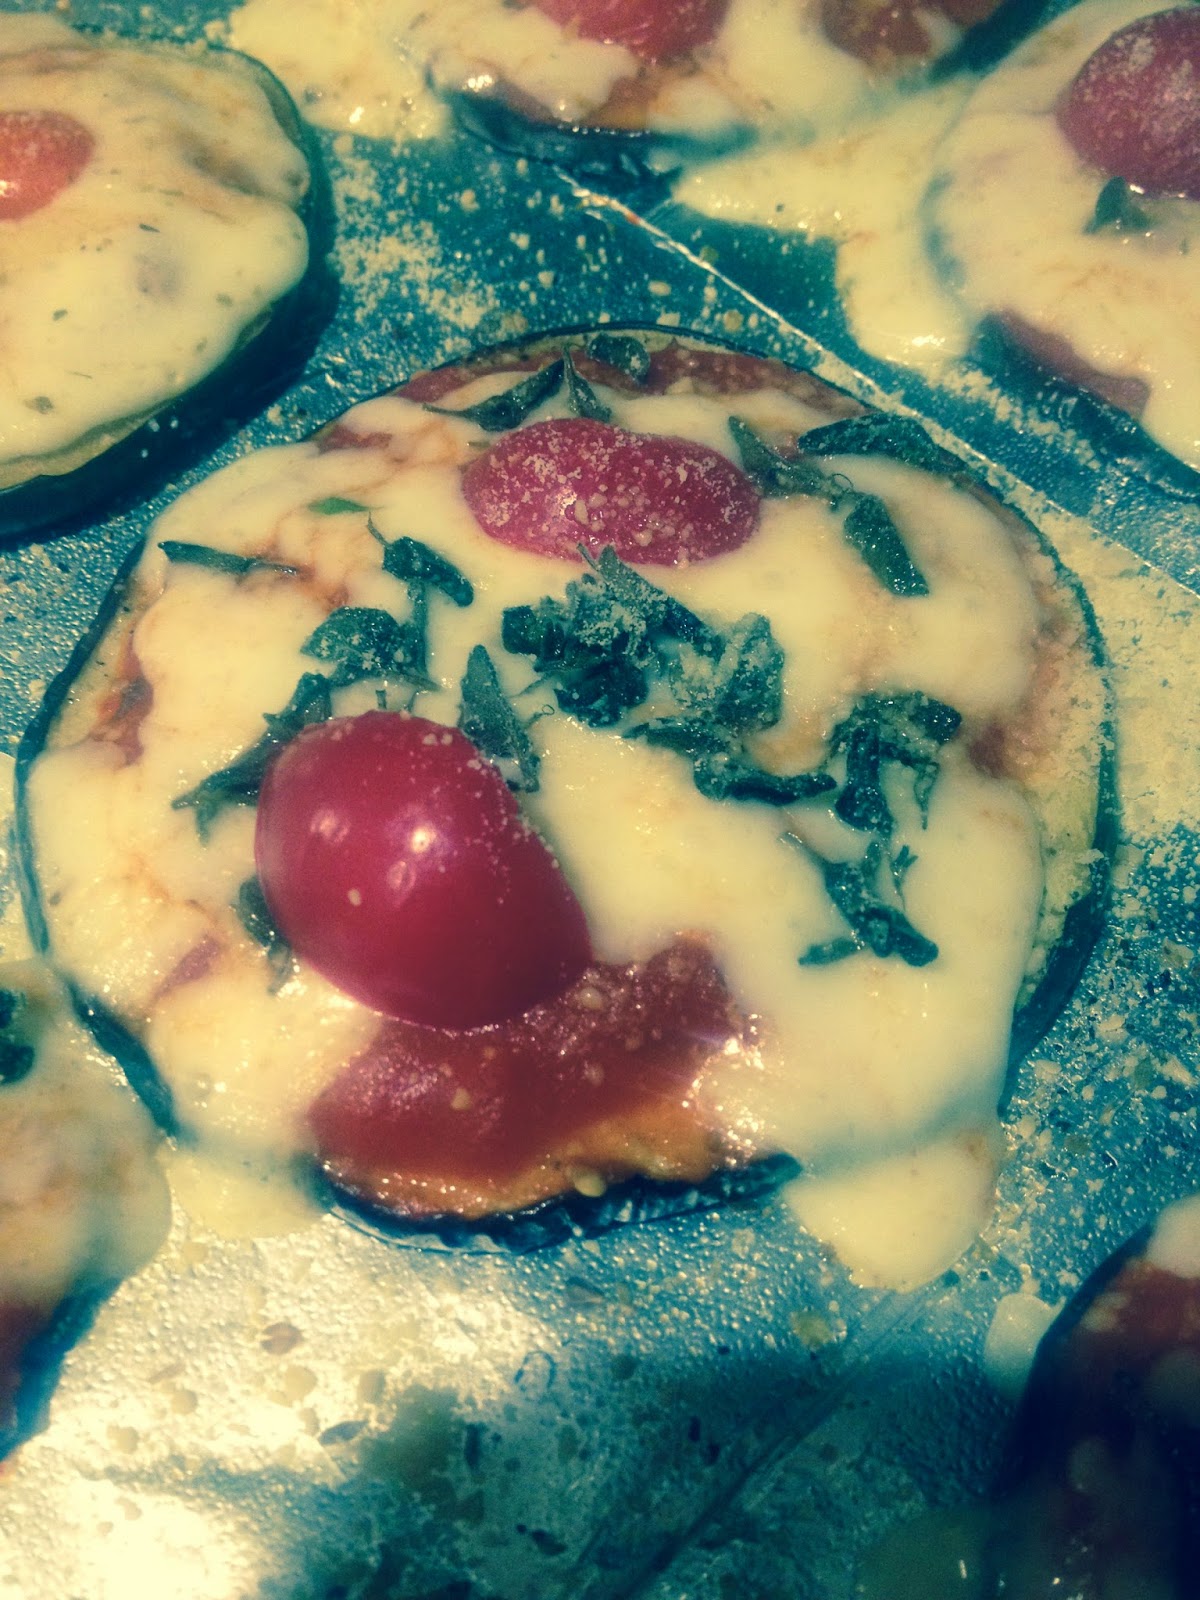
Easy, Healthy, Vegetarian, Oregano & Tomato Eggplant Pizza

What you'll need:
2 large globe eggplants
1 large jar of garlic marinara sauce
handful of grape tomatoes
fresh oregano
dried oregano seasoning
granulated garlic seasoning
grated mozzarella cheese
crumbled Parmesan cheese
olive oil 
salt/pepper

Step 1:
Slice the eggplant into circles. Make sure they are all about the same thickness. Lay them out onto paper towels and sprinkle them with salt. Let them sit for about 30 minutes. This will help to pull any water from the eggplant. Once the eggplant slices have been sitting for about 30 minutes, wipe off the excess salt and place them on a baking sheet. Using a brush, glaze each eggplant circle with olive oil and top with pepper, dried oregano, and garlic seasoning. Put them in the oven for about 25 minutes at 375 degrees. 

Step 2: 
While the eggplant is cooking, dice your grape tomatoes into halves.


Step 3:
Prepare your oregano, grate your cheese, etc. 


Step 4:
Once the eggplant has been in the oven for about 25 minutes (before it gets mushy), pull it out and decorate your pizza. I started with a thin layer of garlic marinara sauce, topped with a generous amount of mozzarella cheese. Next, add your fresh oregano, tomatoes, and sprinkle Parmesan cheese on top. The eggplant pizzas will go back in the oven until the cheese looks melted and starts to slightly brown (approx. 20 minutes).


Step 5: 
When they look melted and golden brown, they are ready to eat! Take them out of the oven and let them cool for about 10 minutes. 


We had some leftovers, so I stacked them—lasagna style—for Mark's lunch the next day. 
*Note: I also took a few pieces to work the next day. To heat them up I used a convection oven and I actually preferred them more the second day. The eggplant was more crisp and crunchy. 

Tuesday, September 23, 2014

Delicious, Healthy, Baked, Vegetarian, Tacos de Papa (Potato Tacos)

This is one of my favorite meals!

What you'll need:
8-12 tortillas (I use fancy ones with a blend of corn and whole wheat)
6 large russet potatoes
3 large jalapenos
1/2 spicy taco seasoning packet
chopped spinach 
Pico de Gallo or salsa
sour cream (to taste)
Monterrey Jack cheese (to taste)
olive oil (to taste)

Step 1: 
Wash and chop potatoes into bite-size chunks.
Slice jalapenos into small pieces and mix-in with potatoes.
Drizzle olive oil over the mixtures and top it with your spicy taco seasoning.
Toss the mixture by hand until everything is coated.
Cover with foil and put in the oven for about 30 minutes at 450 degrees.


Step 2:
After 30 minutes have passed, pull your potatoes out of the oven and toss them around.
Then put them back in the oven, uncovered, for about 15 minutes. 


Step 3: 
While the potatoes are finished browning, I grated a block of Monterrey Jack cheese.


Step 4:
Place your tortillas on a rack in the oven to get them crispy and "taco-shaped". I usually leave them in the oven for about 8-12 minutes or until the ends begin to brown. 
*Note: It helps to spray them with Pam or apply a thin layer of butter so the tortillas don't stick to the metal oven rack.  


Step 5: 
I chopped up about 2 handfuls of fresh spinach and I also used Pico de Gallo that I picked up at the grocery store.


Step 6: 
Start filling up your tortillas!
First, let your shells cool and when they have hardened, put a large scoop of the potato mixture in the tortilla. Second, load up the steamy potato mix with cheese. Top it off with spinach, Pico de Gallo, and a dollop of sour cream. Then finish your taco with your favorite hot sauce—mine is Cholula!


Step 7:
Enjoy! 

Thursday, September 18, 2014

Vegetable Tacos with Cauliflower Rice

This recipe is quick and painless—aside from the time consuming cutting of the fresh veggies. 
I was surprised at how well it turned out! I will be repeating this, with some minor tweaks. 

I started by chopping up my vegetables into bite-sized chunks.

First, red bell pepper...


Next, yellow bell pepper...


Then, green bell pepper...


Followed by a yellow squash...


Then a large zucchini...


And I topped it off with diced onion. 


I also added a little bit of parsley for color. I put all of the veggie chunks in an aluminum pan and mixed them around with some olive oil. I then put the dish in the oven at 400 degrees for about 40 minutes to get them slightly softened, but you don't want to leave them in there too long or they'll get mushy (personal preference). I tossed them around every 10 minutes or so. 
Next, I took a full head of cauliflower and cut off the stem. Then I grated it, just like cheese, into a microwave-safe bowl. This is going to be your "rice". I put my large bowl of grated cauliflower into the microwave for about 3 minutes, in 1 minutes increments. 


I made my own seasoning for the "rice" with a mix of Cholula, Tapatio, and powdered taco seasoning. I prefer my dishes to be pretty spicy, so how you make your mix will be entirely up to you. I put everything together in a microwave safe bowl and heated it up together to get the powder to mix in well with the liquids.


Meanwhile, the tortillas were lightly sprayed with Pam and hung over the oven racks to form a shell crispy and give them that classic taco crunch. It take about 10 minutes to get them to where I want them, but everyone is different. 


Once the "rice" seasoning was complete, I poured it over my steamed cauliflower and added some canned corn. I them microwaved everything together for another 2 minutes. 


I drained and rinsed a can of black beans, which I also heated up in the microwave for about 3 minutes. 


Then I filled my tacos up, starting with a layer of cauliflower rice. Followed by a thin layer of black beans, and a hearty layer of my baked vegetable medly. Topped with shredded sharp chedar cheese. 


This meal has a lot of flavors, is filling, and is very healthy! The only thing I would change is the way I cooked the cauliflower. I may look for another recipe which includes water or maybe, boiling the "rice". I would have preferred it had no crunch at all—like basic rice—but because I didn't include any moisture while it was cooking it didn't ever get completely soft. Other than that, it turned out great and I was very happy!


Friday, September 5, 2014

Veggie Pasta Casserole

This is another one of my meals on-the-go. You can make this dish and put it in the fridge for a few days until you're ready to cook it. This meal is also pretty simple to put together.

First I started with a red, orange, green, and yellow pepper—diced. I love using pepper because not only are they pretty, but they add an nice array of flavors to your dish.


I used quite a bit on onion in this recipe because I wanted that extra crunch. I used about a half of a red onion and a half of a white onion. 


Since I love a little kick to my food, I added a green chili and a jalapeno into the mix. 


Then, I sliced up a large zucchini.


I also cut up a yellow squash. 


Once I finished the most time consuming portion of the meal—the cutting—I put on a pot of boiling water and cooked my pasta. *I probably should have used a newer pot because this one looks pretty beat up... J


When the noodles finished cooking and were drained, I added a jar of garlic tomato sauce and two fresh tomatoes, which I diced into large chunks. 


Next, I mixed everything together and covered the top of the casserole with the same cheese blend I used in my enchiladas, which is a mix of Monterrey jack, mozzarella, and sharp cheddar. I added some wooden stakes to the corners to keep the foil from baking onto the cheese when I put it in the oven. 


When I was ready to heat it up, a few days after making it, I heated the oven up to 400 degrees and let it bake for about 40 minutes without removing the foil. I then removed the foil and baked it for another 15 to get the cheese fully melted and the edges a bit crunchy. (I baked mine for a little longer than usual because the dish I prepared the casserole in was very deep and I wanted to make sure the bottom wasn't still raw.) 


It turned out great and I had a lot of leftovers for the rest of the week!
*If you prefer a more "saucy" pasta, I would recommend using 1 1/2 or 2 jars of sauce.*

Thursday, September 4, 2014

Chunky Veggie Enchiladas

Since the beginning of the year (and especially the last few months), I have taken a more conscientious approach to eating and simply paying attention to what I am putting into my body. My goal is to eat more vegetables and no meat. The transition has been slow because I never used to stop and think about how many breakfast, lunch, and dinner meals include meat. Meals take a little more 'prep and plan' time to ensure they are healthy and meat free, but I am up for the challenge. I've been attempting to create new dishes based off of some of my favorite recipes.

Chunky Veggie Enchiladas are a healthy and great for people on-the-go. I made these two days before I actually cooked them. Once they were finished I put foil over the top and stuck them in the fridge for a couple days.

Cutting up the vegetables is the most time consuming part of this recipe.
I started with an array of fresh, clean veggies: zucchini, squash, red onion, tomato, green chili, and jalapeno. I also Incorporated drained and rinsed black beans and corn. I prefer a little spice in my food, so I also included Tapatio and Cholula sauce. I topped it off with Sprouts Green Enchilada sauce. I usually use a similar tortilla, but it has grains and seeds in it to add a bit of taste and texture. Oh, and don't forget the cheese!


Once I got all of my ingredients chopped up, I mixed them up together in a large bowl—and when I say large, I mean it because this recipe makes about 16 enchiladas. I had to use additional generic flour tortillas from the bread box to use the rest of my mixture. I got an assembly line going: lay down one tortilla (feel free to heat them in the microwave for a few seconds to loosen them up), place 1 large serving spoonful of the veggie mixture on the tortilla, then sprinkle cheese on top. I used a blend of sharp cheddar, Monterrey jack, and mozzarella. Then I drizzled Tapatio and Cholula sauce on top of the cheese. I intentionally overfill my tortillas so they are full of veggies even if I lose some during the cooking process. I rolled my tortilla up and placed them inside an aluminum dish. Once the enchiladas were rolled I took my bottle of green sauce and smothered the top of the enchiladas and covered the tray with foil.


When I was ready to cook them, I took them straight from the refrigerator to the oven. I preheated the oven to 375 degrees and popped these in for about 40 minutes with the foil still covering the tray. I did this to ensure the raw veggies had a chance to cook without over-drying the tortillas. While they were baking I put a pot of Spanish rice on the stove. After the 40 minutes were up, I took the foil off and let them cook another 20 minutes to allow the tortilla to slightly brown. This added a nice crunch to the top of the enchiladas. 


This dish is a little messy (as you can see), but very flavorful. I noticed the bottoms of the tortillas did get a bit soggy from sitting in the enchilada sauce, so next time I might choose to use a little less and focus more on the tops rather then drenching them entirely in sauce. 

Thursday, August 28, 2014

Roasted Pepper & Chicken Teriyaki Brown Rice Bowl (with vegetarian option)

This is one of the easiest meals to create! It is healthy, flavorful, and only takes about 30 minutes to prepare.

First, I stuck two half-frozen chicken breasts in a large pan and put them on the stove with a lid so they would begin to cook and thaw. I then began to cut my (clean) veggies into bite-size chunks. I also started a pot of brown rice and let it slowly cook in the background.

I started with a green chili:


Then I cut up an orange pepper and a jalapeno:


Next, I cut up a red, green, and yellow pepper to add to the mix:


Once the chicken started to defrost and cook, I pulled it off the oven and cut it into slices:


I put the peppers in a different large pan and roasted them on the stove with a little bit of oil:


I added a mixture of teriyaki and soy sauce to the chicken and the vegetables just to give it a little zing. After everything has been thoroughly cooked I put rice in two bowls and for my dinner I only added the veggies:


For Mark's dinner I added the veggies and chicken:


You're welcomed to add sauce or seasoning to your liking. This dinner is super easy for those nights you get home late and want to whip up something healthy!

Thursday, August 21, 2014

Annie's Homegrown Frozen Pizza & Salad

This dinner was delicious and took less than 20 minutes to prepare!

I threw an Annie's Homegrown Frozen Cheese Pizza in the oven for about 17 minutes at 400 degrees. While it was cooking I chopped up a full head of romaine lettuce, 1 tomato, 1 green bell pepper, 1 red bell pepper, and mixed it all together with a handful of zesty tortilla strips. Then I topped it with some Annie's salad dressing.


*You should always clean your fruits and veggies before consumption. Each week after a trip to the grocery store, I clean the sink and fill it with cold water and fruit & veggie cleaner. I let all of my fruits and vegetables soak for about 5-10 minutes. What is leftover in the sink once they are removed and rinsed off is pretty gross...*